The global outbreak of COVID-19 has influenced the lives of billions of people across all continents. While millions of businesses closed down their offices and introduced home-working as an option, the private sector was not the only one that got hit hard by these measures.
Over 160 countries have implemented nationwide closures of schools & educational institutions, impacting over 87% of the world’s student population.
While the prediction in many countries is that the schools will not open during this semester, it is a huge responsibility of teachers & pedagogical staff to ensure continuous learning of our younger generations.
Unfortunately, the education system in the vast majority of the countries is not ready for such a sudden, unplanned change. Teachers from all over the world are missing tools, guidelines & necessary training, and, most times, coordination.
For this reason, Port Cities - the biggest Odoo partner in the world, prepared a step-by-step guide for all the teachers on how to set up & get running your education programs on Odoo E-learning platform within one afternoon. The only investment needed is your time.
1. Odoo - a great free tool for schools
Odoo is an open-source all-in-one management system, which aims to help various businesses & organizations in making their business processes streamlined & efficient. Even though Odoo is not primarily dedicated to teachers & schools, some of its over 60 applications build a nice, simple yet professional looking education platform.
Odoo E-learning
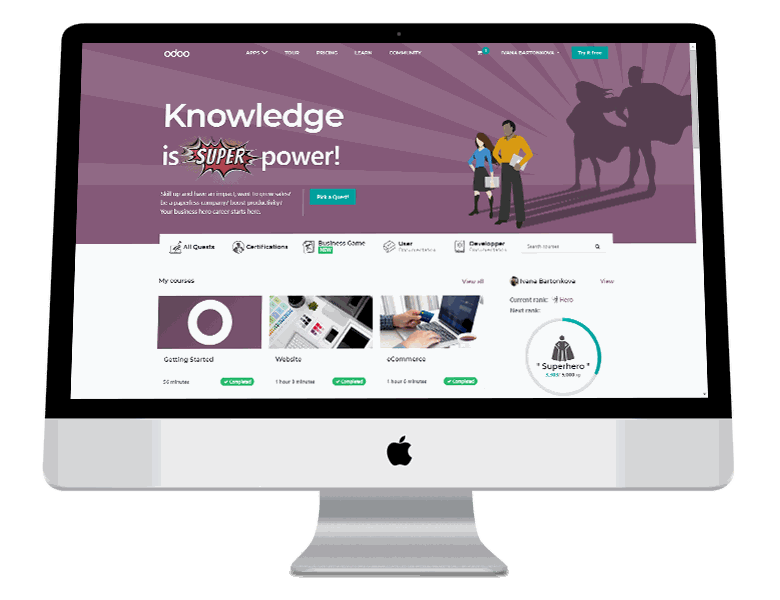
Since the latest version of Odoo (Odoo 13 - published in October 2019), Odoo E-learning provides an application to create online courses & lessons. Teachers & lecturers can create their content, be it a presentation, video, text, a picture or a document. They can also attach extra resources, documents & assignments for further understanding of the topic.
Educators can prepare a short quiz as a follow-up to each lesson to ensure the students understood the topic well. This functionality is also enriched by gamification functions and your students can collect experience points, level up, collect badges & win small gifts (or a good grade).
Surveys
Odoo Survey application has been an integral part of Odoo for several years, although the newest version (Odoo 13) brought major improvements. It allows us to create questionnaires with different question types (open questions, multiple options), set a maximum time limit for submitting the test & also to score points for correct answers.
With these functionalities, it is very convenient to use Odoo as a tool for the classification of your students, since you can also set a limit for successfully passing the exam. It can be a very nice complement to the e-learning courses to test your students from various topics or to collect their feedback.
Website
Building a web portal for your students helps to keep them informed and updated even in these pandemic times. This channel is perfect for sharing official announcements, assigning homework & keeping your students on track with their deadlines, even if the schools are operating as usual.
Odoo website has a very nice visual editor which ensures that everyone, even if they have never created a website before, can design a functioning and visually appealing one. You do not need to know how to code - you just drag & drop the building blocks you want to use, change texts & pictures.
2. How to build an Odoo e-learning platform
Odoo provides 1 application for unlimited users for free, forever. However, in this article, it is mentioned that you can get applications E-learning, Website & Survey without the need to pay hosting or license fee. How to achieve that?
This trick has a short explanation - application Survey is a free application for all the Odoo users, and the application Website is mandatory for the installation of application E-learning. Knowing this logic, you can get free access to all these 3 applications (since you are registering for the E-learning one).
Create your Odoo database for free
The first step to start your e-learning platform is to register your Odoo database. Make sure to select only applications Website & E-learning. After successfully choosing these 2 applications, click on start now on the right side of your screen.
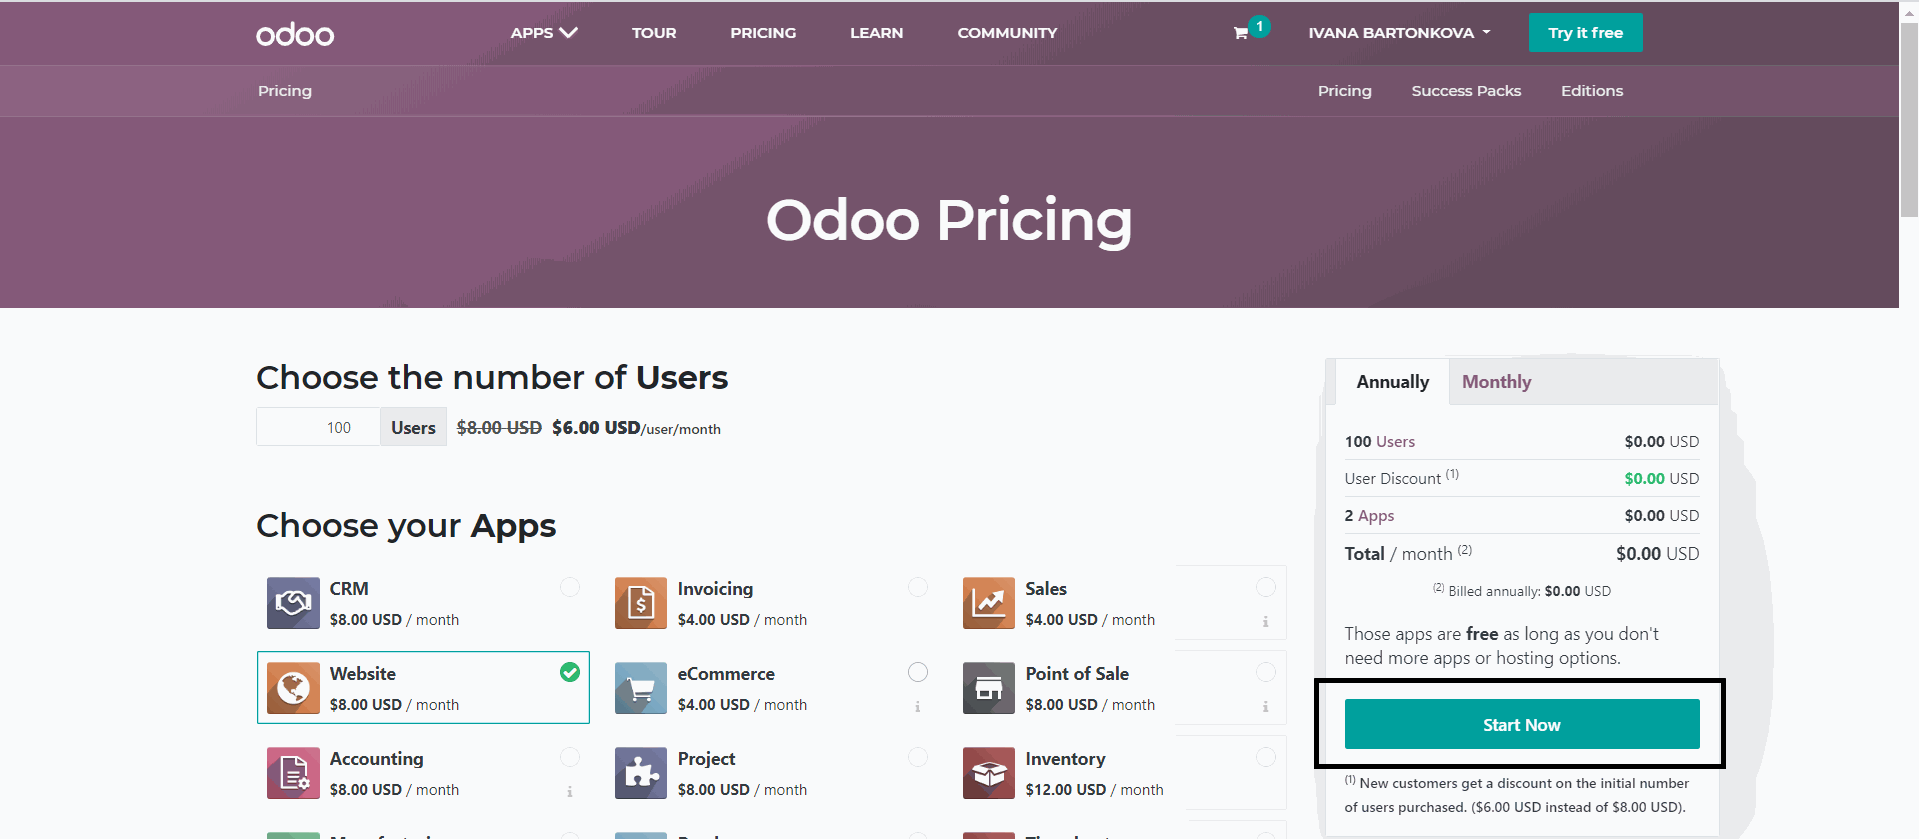
Odoo will guide you through its new database wizard, let you choose your domain and set up the new database with your new applications for you. This setup is usually shorter than 5 minutes and you will get access to your system.

Configure your Odoo
General settings & access to your colleagues
Before you start creating first courses, quizzes or other content for your students, it is important to configure the first few settings.
Set up your school information
In the menu Settings → Companies → Update Info, it is important to set up information about your school or organization. This information will be visible on your website portal.
Give access to your colleagues
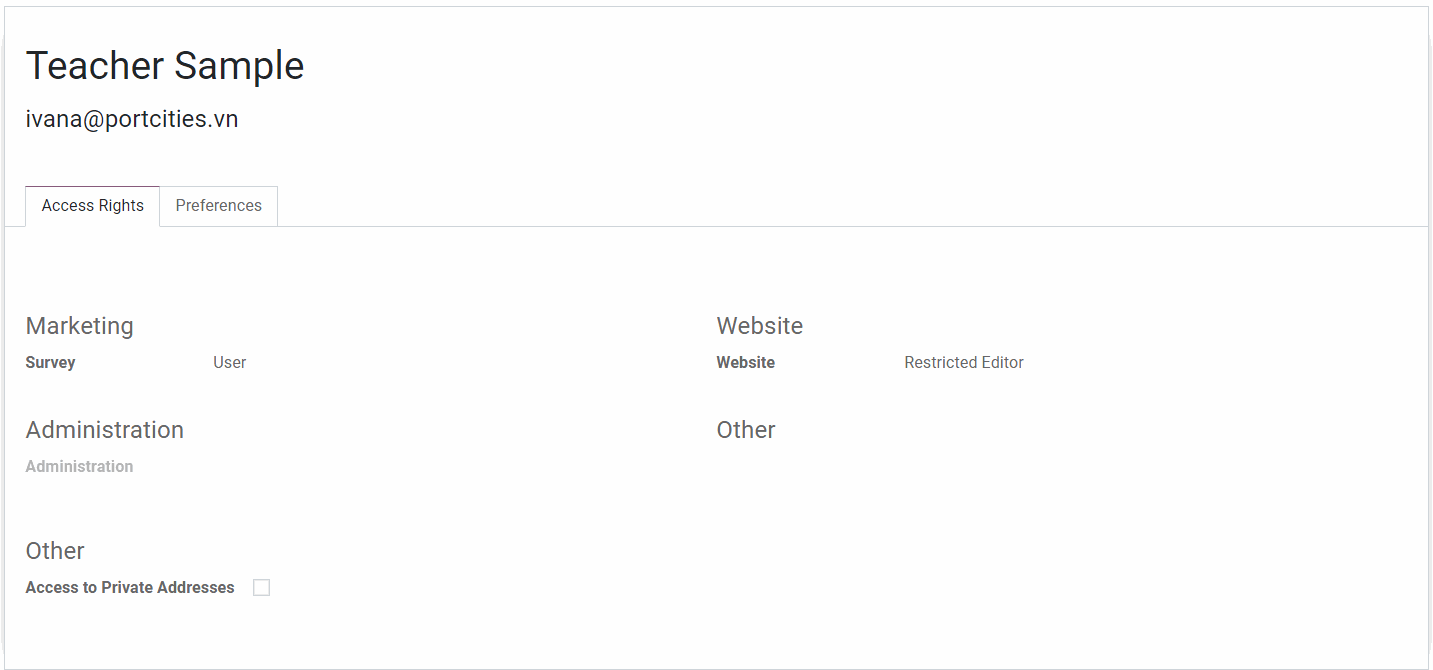
As a system administrator, you can grant access to your colleagues, so they can start creating their content as well. Odoo will ask you for their email address, as well as you will need to choose the level of access to the system.
You can do so in menu Settings → Users → Manage Users.
Recommended settings for new teachers
Access rights Odoo Survey:
User → allows users to create new surveys, tests, quizzes.
Administrator → a part of creating new content allows seeing the detailed answers & full details of participants of all quizzes.
Access rights Odoo Website
The restricted editor → allows users to create new pages & e-learning materials.
Editor & designer → a part of the creation of new content, allows changing the settings of your website, its design, fonts, menu. It is recommended not to grant these access rights to your colleagues.
Access rights Odoo Administration
Administrator → a user with these access rights can change the system settings, install new apps & manage the users. It is not recommended to give this access to other users unless they know how to work with Odoo very well.
Access rights → a user with these access rights can grant access to other people.
Survey
After everything is set, you can start designing your first quiz for your students! In the main menu, click on Surveys & create a new one. We will go step by step through the settings:
Before you start creating questions for your student, we need to firstly set, how will the quiz look like. Will there be a time limit? Will you be scoring the answers?
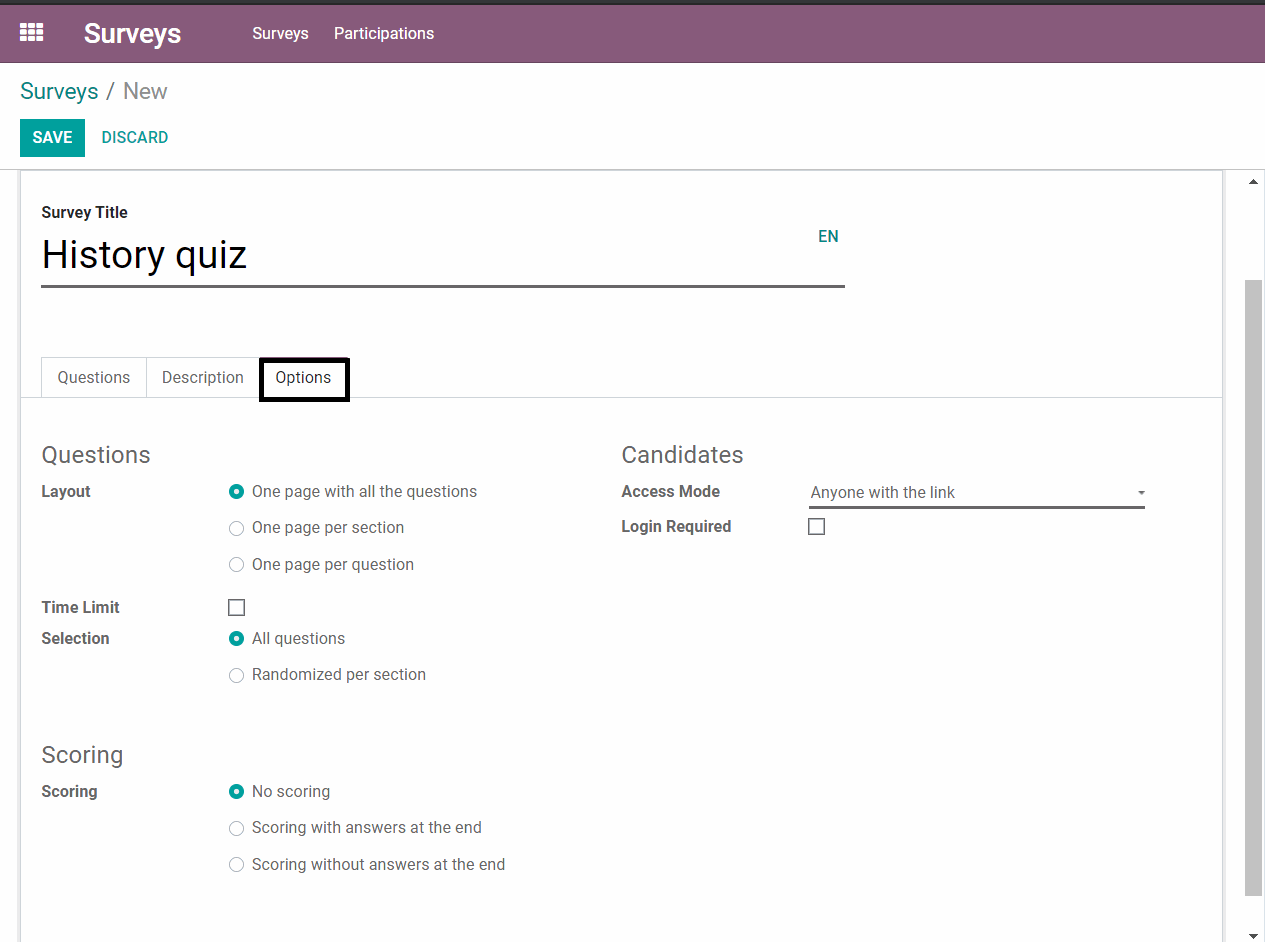
Layout - you need to choose how the quiz will look like. Is it only a short one with 5 questions? Then one page with all the questions should be sufficient. However, in case you are designing a big test with many questions or tasks, it is better to choose one page per section or question option.
Time limit - in case there is a limited time for completing the form, you can set what is the maximum limit in minutes. The timer will be then shown to all people who start filling in the form.
Selection - should there be a strict order of the questions, or should the order be random? You can use randomized order in the case of evaluated tests, so the participants are less likely to “collaborate” unwantedly.
Scoring - in case you want to score your students, Odoo allows you to do so! You can choose whether you want to show the students correct answers after they submit theirs (very useful for homeschooling), or whether not (useful for classification tests). In case students pass, you can even send them a personalized certificate that they passed this test.
E-learning
The best way to understand all possibilities of Odoo E-learning and to access the E-learning video courses is to visit the Odoo E-learning platform.
Plan the structure of your courses & lessons
An important step, before you start creating and uploading your content into Odoo, is to plan how the structure of the e-learning will look like.
First, the biggest unit is Course (black rectangle, in our example Biology), which is basically a lesson. You can tag it (recommended is to use grades, so the students can easily filter the courses), split it into sections (red rectangle, recommended are the thematic units) and create lessons (blue rectangle) under these sections.
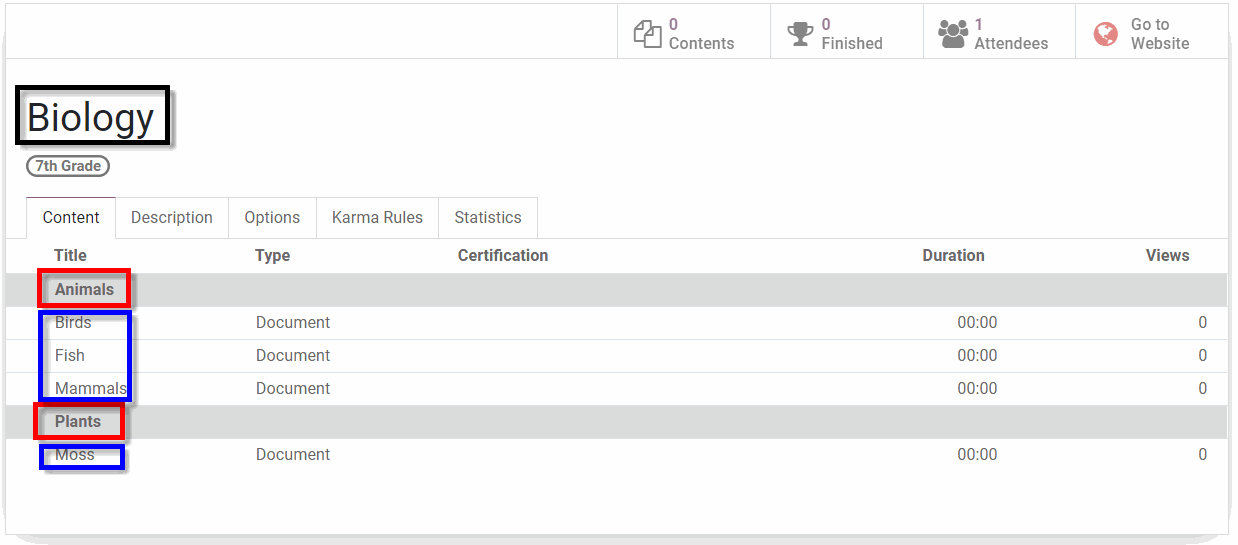
Using sections will help your students to navigate through your courses faster and enjoy their learning experience even more.

Set up your first lesson
When your structure of the lessons is set up, you can proceed with preparing the first lesson for your students & pupils.
The most important settings about the course itself are on the tab Document. You need to choose the learning material type (video, presentation, document, etc.), upload it to Odoo, and it is also advised to fill in the duration. Like that, it will be easier to choose a lesson for your students based on their current time availability.
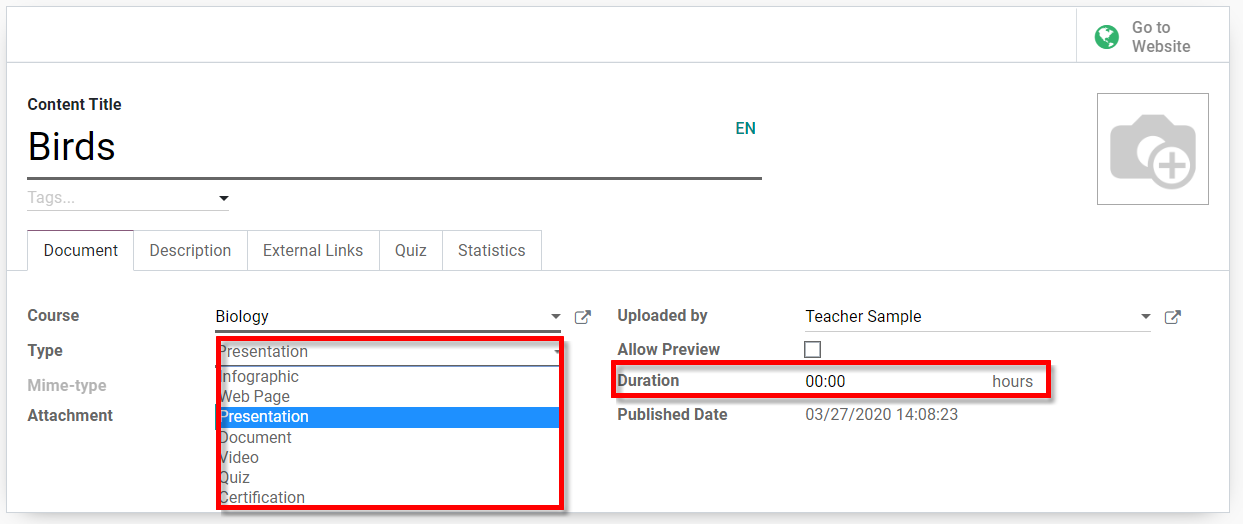
In case short quiz should complement your lesson to strengthen the newly learned skill or knowledge, you can create several questions on the tab quiz (the system is the same as in Odoo Survey) and let your students collect points for correct answers.
Gamification as an integral part of e-learning
Schola Ludus (School by play) is a well-known book from Johann Amos Comenius, a famous Czech pedagogue, written in 1630. The approach of learning by play has been proved as an effective way to engage even less active students and to strengthen the newly learned knowledge.
In its e-learning, Odoo offers the option to let the students collect achievement & experience to achieve a higher ranking.
The first important step to take is configuring the rankings your students can achieve by collecting the experience (karma) points. To configure the ranking, you need to turn on the developer mode (Go to Settings → Scroll down & click on Activate the developer mode.
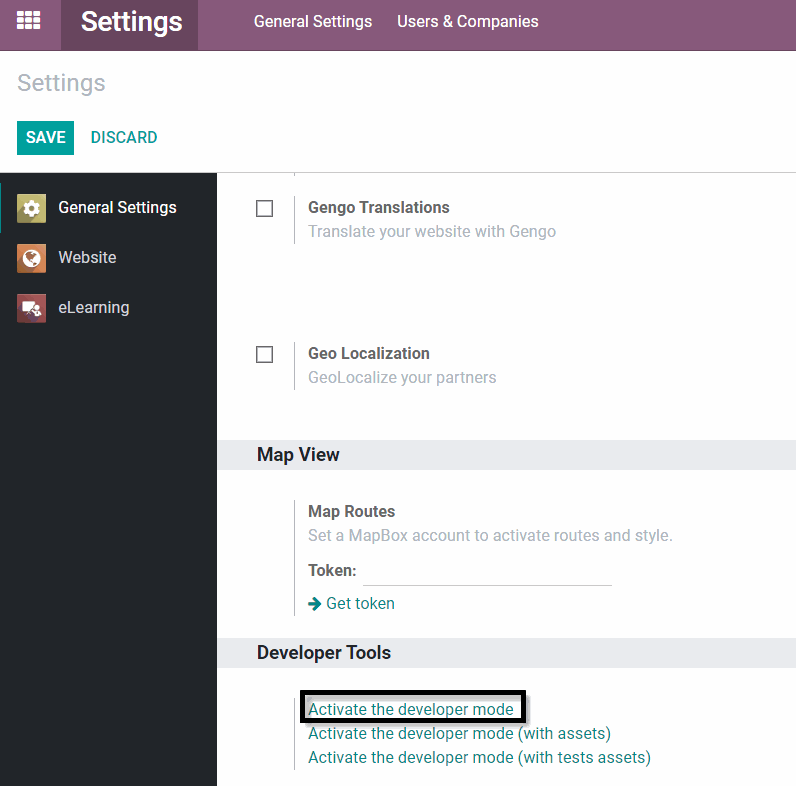
After refreshing the screen, you will see a new menu Gamification. To set the ranking system, go to Gamification → Ranks. From this place, you can create new rankings, set up the minimum amount of points to achieve them and to include motivational text and pictures to reach higher rank (be it an officially achieved good grade, or any other appreciation to your most studious pupils.

Website
Design your educational website
How the education portal looks is definitely an important aspect of the student experience. Fortunately, Odoo has a configuration wizard, which helps you to set up the layout, fonts, colors & design of your menu. To access it, you need to go to your website, click on the menu Customize → Customize Theme.
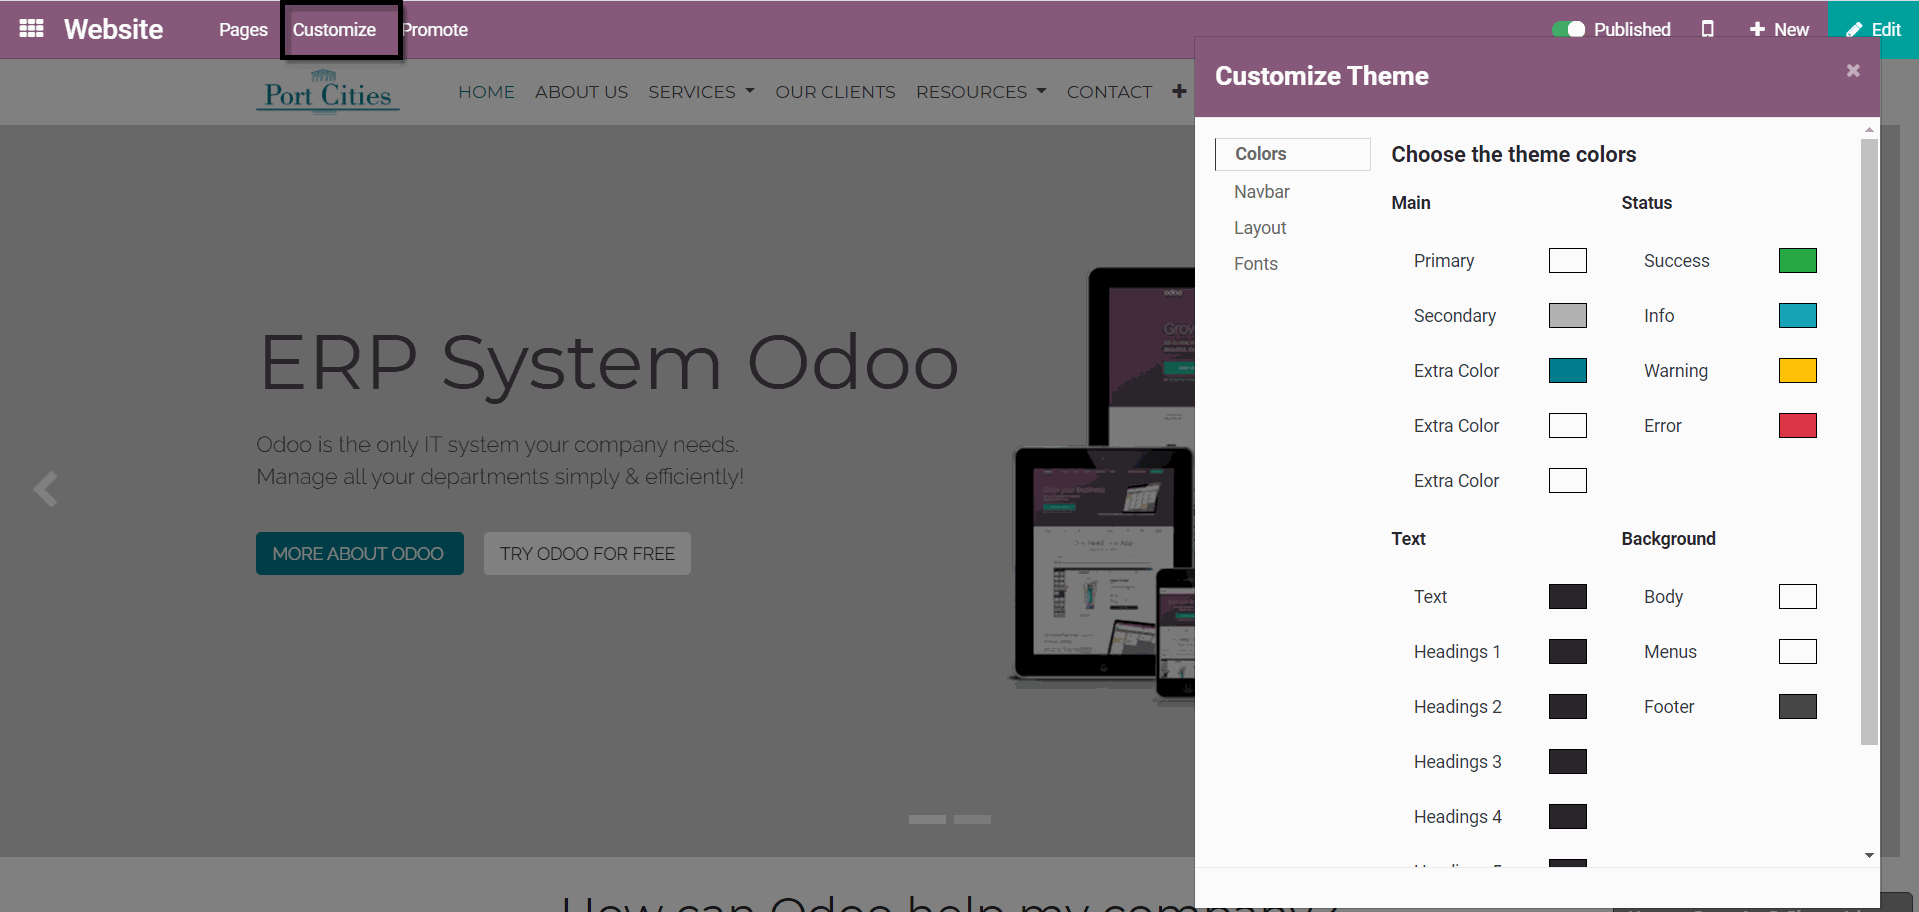
Create a website navigation menu
To make the navigation of your website more intuitive to your students, it is necessary to think about its structure. It is important to decide, whether your website will be structured by grades, by subjects or by any other logic.
To apply this logic for your website, go to your website, choose the menu Pages → Edit menu.
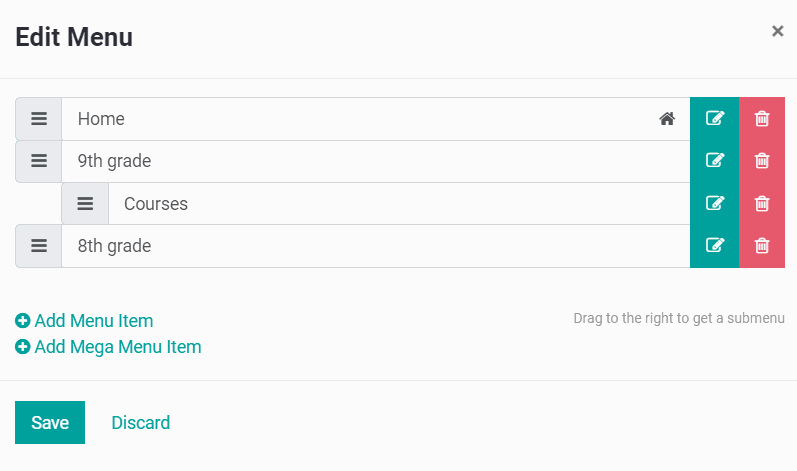
You can change the order of the pages by dragging them to the desired position or you can add new ones by clicking on “Add Menu Item”. Of course, it is possible to set several levels of menu, then only the lowest level will be linked to a specific page, higher levels will only display the lower levels.

Publish your first page or announcement
Now, when you already set up the structure of your website, it is time to prepare the pages & content. New Page is created by clicking on New in the upper right corner and then choosing option New Page.
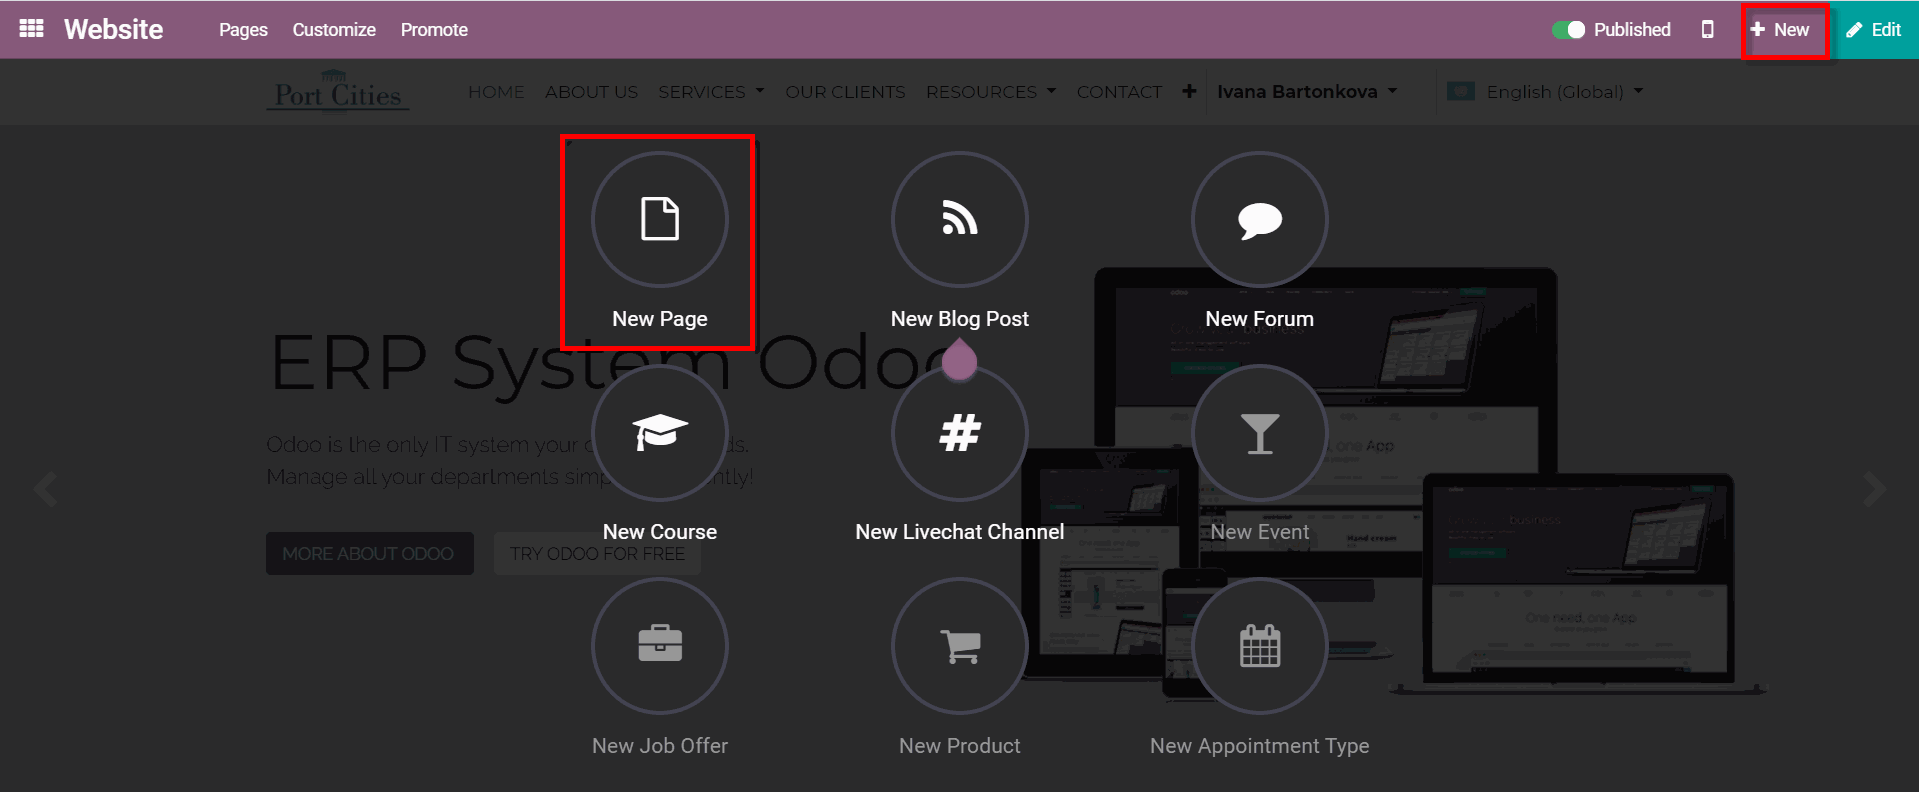
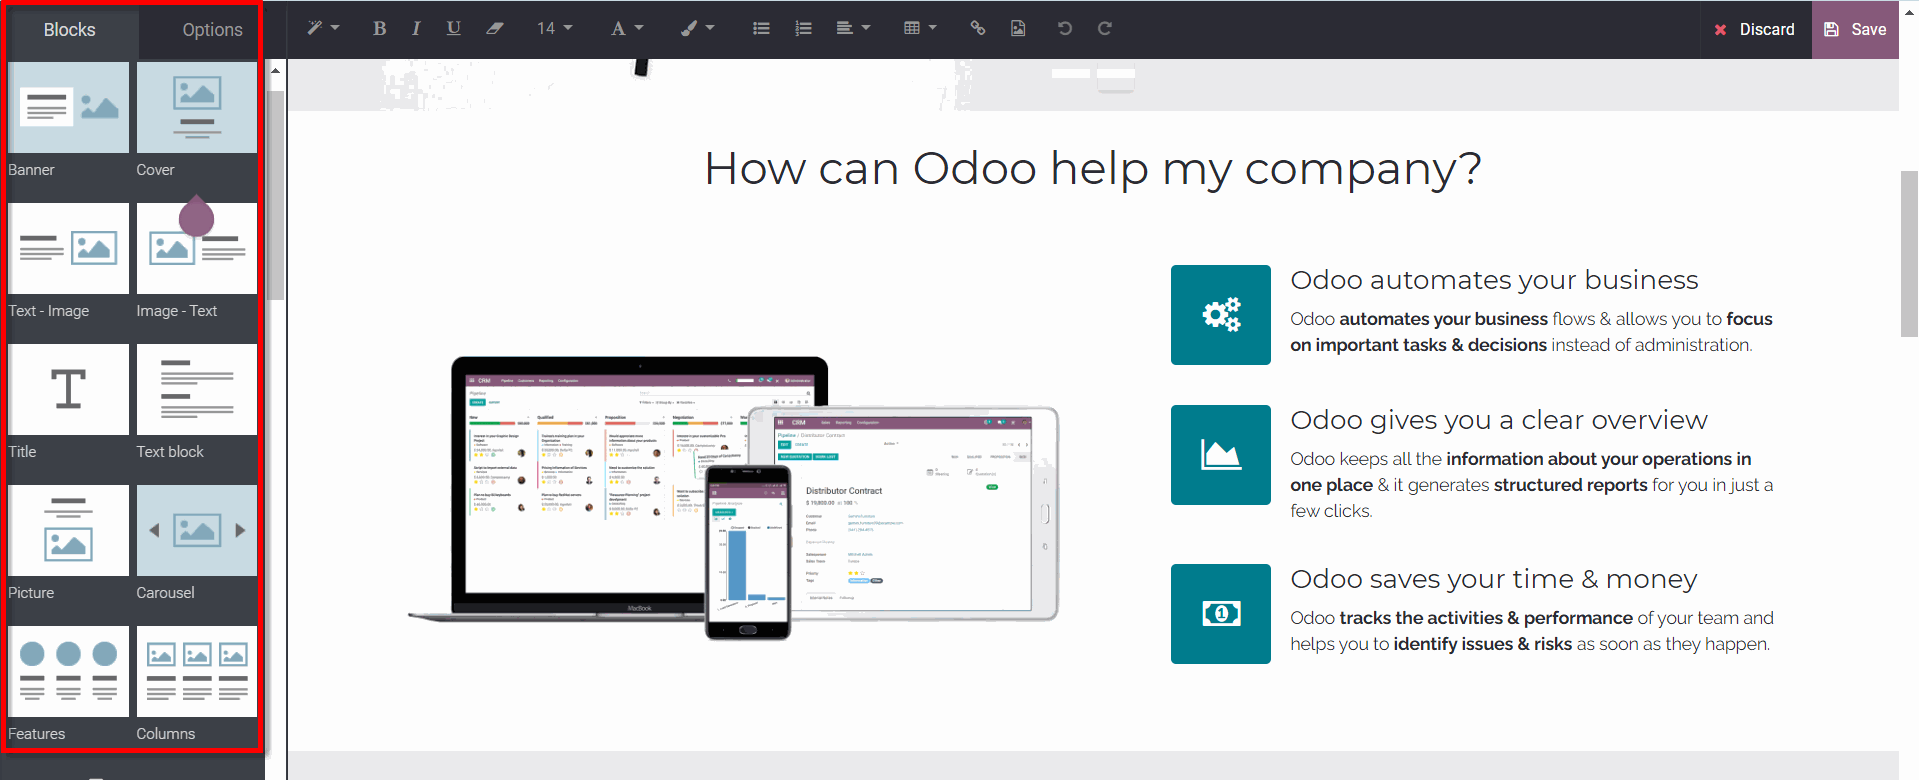
You can then edit it by clicking on the button Edit in the upper right corner. You will be able to select, drag & drop the desired building block to your page, adjust its text, picture, colors. After you are satisfied with your changes, do not forget to save the page. The last step is clicking on the button publish in the top menu, so your students can access it. Simple as that!
EXPLORE MORE ABOUT ODOO WEBSITE
Create great content
To prepare exciting and interesting videos, it is necessary to have a good screen recording tool. Did you know that most PCs with Windows 10 have a tool to record both your screen & voice built-in?
You can find this functionality in an application called Xbox. Originally, it was developed for all the gamers to record & comment on their screen while gaming. However, this functionality comes in handy if you want to record your screen (you can show slides, videos, images, …) & your voiceover. You start this program by pressing Win+G.
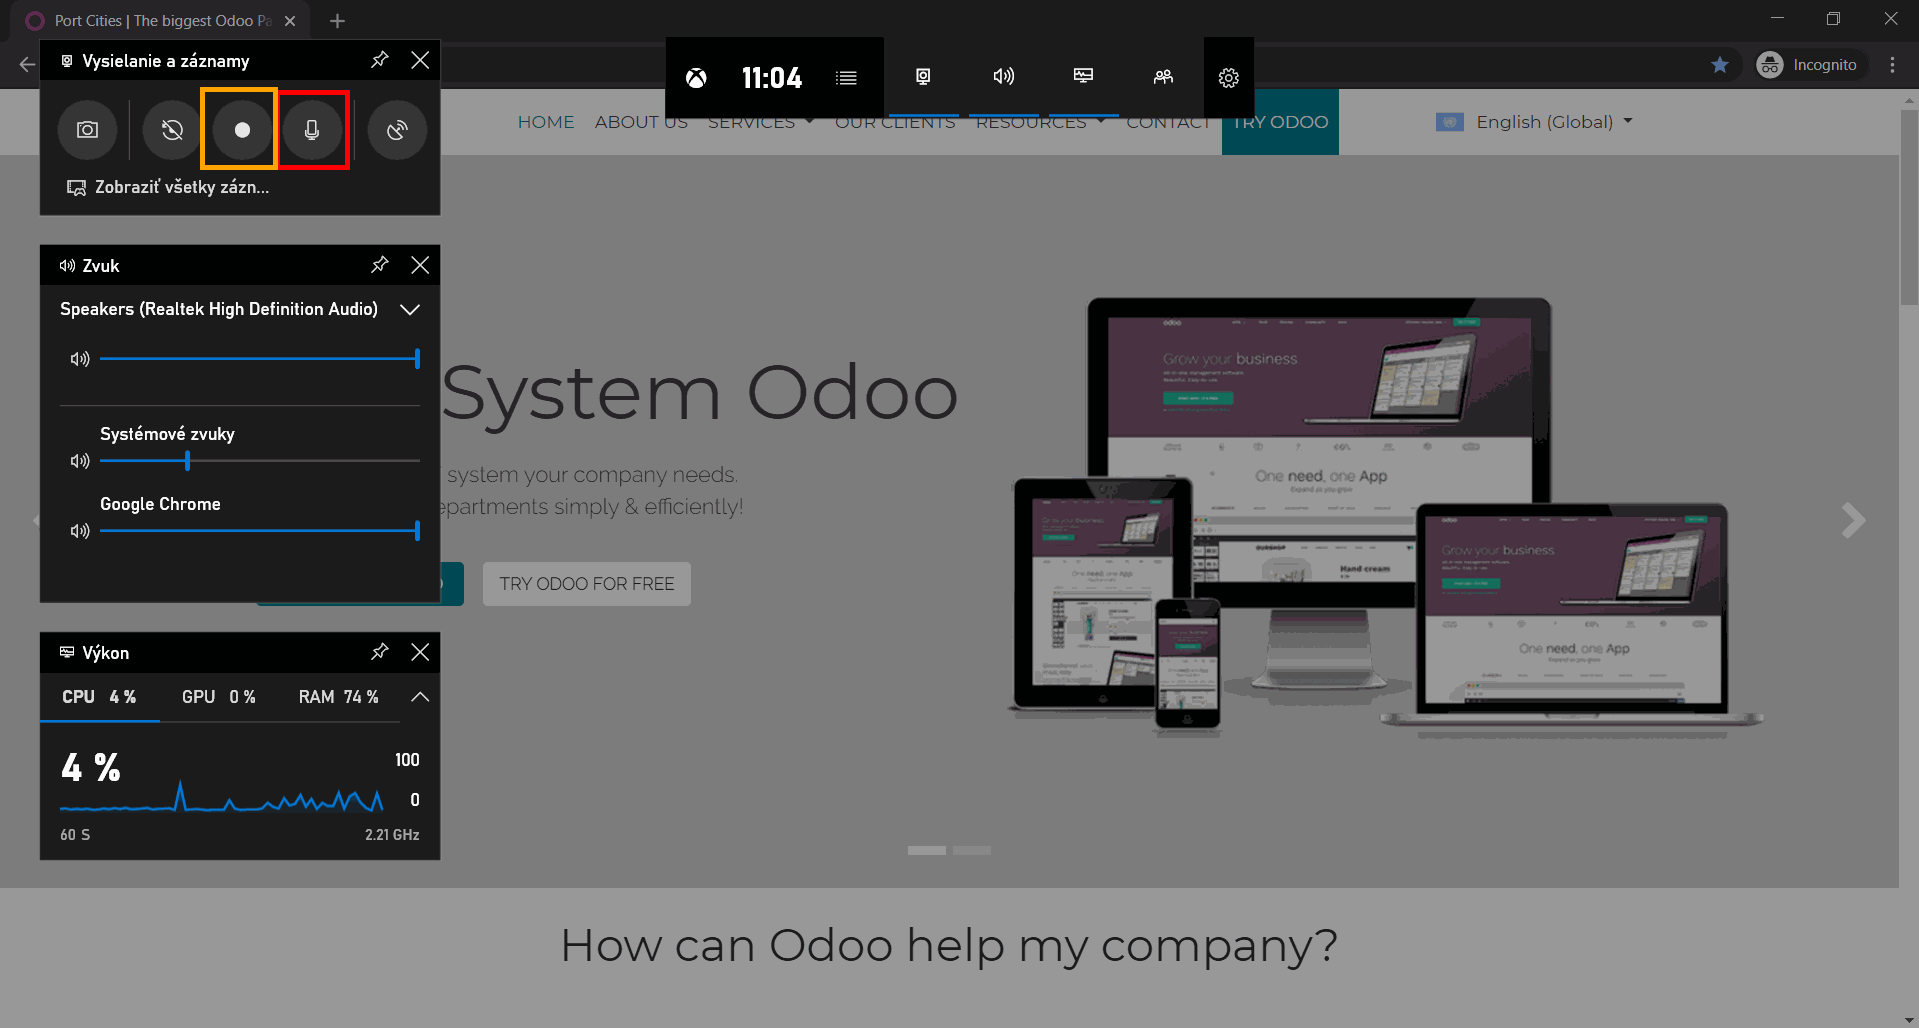
Make sure your microphone is on (button in red rectangle) & start recording by hitting the button record (yellow rectangle).
Your videos will be saved in folder Captures (This PC → Video → Captures). We recommend uploading them on Youtube, so you can use the links for the videos in your newly set up Odoo E-learning platform.
Odoo can improve your school's operations even further
Lots of teachers & lecturers are looking for the right e-learning solution these days, and that is why we prepared this guide to show that it can be achieved even with no budget, just with a minimum of time invested. However, functionalities mentioned above are just a fraction of all the features Odoo provides.
Other important features, such as student database, curriculums, course planning, student attendance & project management can be added to your Odoo to manage all your operations in one system...
Using a smart yet simple app to handle all the information about the classes, assignments, the result is a huge benefit for the teachers, parents (to keep track of their child´s results) & the students themselves.
In today's world, it is important to have on-line access not only because of the pandemic situations but also in regular times, as traveling and mobility are more accessible than any time before in our history. We strongly believe Odoo is a tool, which can help every organization, regardless its size & budget, to transform into a digital one.
Are you interested in using Odoo for your company or organization? Do not hesitate & contact our consultants.